Many of have been using MS Word as a word processor for decades now. What is then an R Markdown document? An R Markdown document is written in markdown (fancy way of saying that it is all in plain text) and embedded in it can be chunks of R code. Once written, you can render the file into many formats including HTML, MS Word and PDF. So, why would someone like me choose to convert a MS Word file to a R Markdown file. Isn’t MS Word enough to meet my needs? I have two good reasons to convert my MS word files of my open-resource Numerical Methods course to R Markdown files.
- On conversion from the MS Equation editor 3.0 to the currently available MS equation editor for .docx files, the equations from my old .doc documents were getting displayed in a compact inline form. Using the display option of an equation would have supposedly helped, but some equations refused to get properly justified, tabbing was becoming a guessing game, and using a created Word style was not helping. Sometimes, equations would not show with letters italicized, and italicizing a single equation would change the whole document to italics font. Ctrl+Z would help in un-italicizing the document but that was not foolproof either as it would sometimes mess up the tabs.
- The second reason was that I was embedding PDF files in a frame in an online adaptive platform lesson and even with a 12-point size in the original document, the font of the PDF files would show up too small (see Figure 1). Yes, one can use a bigger font size in the Word file but this may not be suitable for use in, say, a printed textbook. Maintaining different versions with different font sizes is not a recommended practice in today’s world. A user could alternatively use the magnification option of the PDF file menu, but that creates horizontal scrolls as well in the frame. Also, a user could download the PDF file to be opened in an acrobat reader but that is an inconvenience imposed on them. One could also simply embed an .htm version of the word file but such file content was getting rendered all over the place as my documents included equations, both in inline and display modes, sketches made with Word, tables imported from excel, and plots obtained from a MATLAB output, etc.
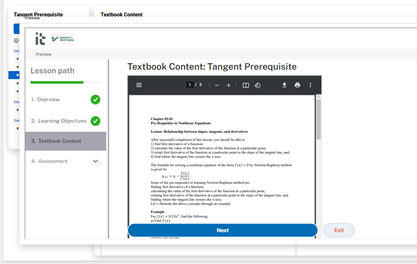
Figure 1: Embedded PDF file shows up with a small font
So the answer was simply to take Rmarkdown for a spin. Since our documents are not simply text, it is not a cut-and-paste job with some light editing. We turned to pandoc for this. What pandoc is can be summarised by their slogan – “If you need to convert files from one markup format into another, pandoc is your swiss-army knife”. Pandoc is a free software and is released under the GPL. The full manual for pandoc is also available.
Here are the steps for how to do the conversion on a Windows 10 machine. One has to do the conversion though at the command prompt level as I did not see an online converter that does the conversion beyond text and styles, that is, they do not convert equations, images, etc.
-
-
- Download pandoc (https://github.com/jgm/pandoc/releases/download/3.2/pandoc-3.2-windows-x86_64.msi) on your PC from https://pandoc.org/installing.html. Click on download installer and you will see a link for https://github.com/jgm/pandoc/releases/download/3.2/pandoc-3.2-windows-x86_64.msi
- Install pandoc as an administrator.
-
Check if Pandoc is installed. Go to the search box in your taskbar and enter “cmd” without the quotes. Run as administrator. You will get the cmd prompt. At the prompt enter “pandoc --version” without the quotes.
- Go to the command prompt by entering “cmd” without the quotes in the search box in your taskbar.
- Go to the directory where the .docx file is stored. You can do this by use cd and cd.. commands. See here for a short guide.
- Once in the directory, do the following. Let’s suppose the name of the file is “Chapter01NumericalMethods.docx”. Type the following at the command prompt.
-
-
pandoc --extract-media ./"Chapter01NumericalMethodsMedia" "Chapter01NumericalMethods.docx" -t markdown -o "Chapter01NumericalMethodsOut.md"
- The above format extracts the media files as well and puts them in a media directory ./Chapter01NumericalMethodsMedia. Some files may be of the .wmf format. These can be opened in MS Paint and saved in an acceptable format such as .png.
- I always use quotes for file names to avoid errors one gets with spaces in filenames, etc.
- It is good practice to use a different name for the output markdown file as one may later be converting the markdown files to different formats including pdf, HTML, word, etc. Note the output markdown file is with an .md suffix as pandoc does not have the output .rmd option.
-
-
- Rename the .md file as .rmd file
- Open the .rmd file in Rstudio to edit.
-
The above is a recipe for just one file. I do gather if one has many .docx files, one could write a script to do this in a batch mode.
We will discuss some tricks to light edit the .rmd file in the next blog. Stay tuned on the journey of this Rmarkdown newbie. If you know a better way to do this, please let me know – autarkaw at yahoo.com.
____________________________
This post is brought to you by
- Holistic Numerical Methods Open Course Ware:
- Numerical Methods for the STEM undergraduate at http://nm.MathForCollege.com;
- Introduction to Matrix Algebra for the STEM undergraduate at http://ma.MathForCollege.com
- the textbooks on
- the Massive Open Online Course (MOOCs) available at
 Source: https://community.canvaslms.com/t5/Instructor-Guide/How-do-I-assign-a-quiz-to-an-individual-student/ta-p/714
 Source: https://support.canvas.fsu.edu/kb/article/977-how-to-allow-extra-time-for-students-on-a-canvas-assessment/