Rather than using the “text to columns” procedure in excel, if you want to use a function to separate the last name and the first name for simplicity of use and the ability to copy the functionality anywhere, here are two functions that are written for you.
I wrote these functions because CANVAS LMS does not have separate columns for first and last names in the grade book. However, they do have an option of showing the full name delimited by a comma. This is preserved when you export the GradeBook.
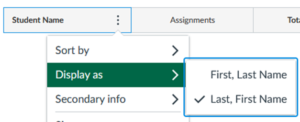
Figure 1: Display name as separated by commas.
To use them, press Alt-F11. It will open up the Microsoft Visual Basic for Applications window. Choose Insert>Module. It will show up as Module1 by default in the VBA Project window. Good to rename the module to say “LastFirstNameBreak” using the Properties Window. Cut and paste the two functions in the module, and save your excel file. You will need to save the excel file as an .xslm file though.
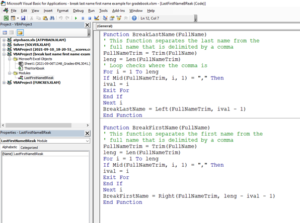
Figure 2. Microsoft VBA Window. Functions are shown below.
Function BreakLastName(FullName)
' This function separates the last name from the
' full name that is delimited by a comma
FullNameTrim = Trim(FullName)
leng = Len(FullNameTrim)
' Loop checks where the comma is
For i = 1 To leng
If Mid(FullNameTrim, i, 1) = "," Then
ival = i
Exit For
End If
Next i
BreakLastName = Left(FullNameTrim, ival - 1)
End Function
Function BreakFirstName(FullName)
' This function separates the first name from the
' full name that is delimited by a comma
FullNameTrim = Trim(FullName)
leng = Len(FullNameTrim)
For i = 1 To leng
If Mid(FullNameTrim, i, 1) = "," Then
ival = i
Exit For
End If
Next i
BreakFirstName = Right(FullNameTrim, leng - ival - 1)
End Function
To use the functions, just use them like any other Excel function. BreakLastName separates the last name, while BreakFirstName separates the first name.
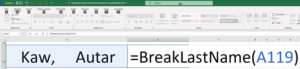
Figure 3. Using the functions in an Excel spreadsheet.
____________________________
This post is brought to you by
- Holistic Numerical Methods Open Course Ware:
- Numerical Methods for the STEM undergraduate at http://nm.MathForCollege.com;
- Introduction to Matrix Algebra for the STEM undergraduate at http://ma.MathForCollege.com
- the textbooks on
- the Massive Open Online Course (MOOCs) available at